Create Your EKS Cluster
We will use the EKSCTL command line tool to create an Amazon Elastic Kubernetes (EKS) cluster. This powerful tool allows you to manage many aspects of your EKS cluster through simple commands. When using EKSCTL, you can still manage your cluster in the Amazon EKS dashboard in the AWS console.
Amazon Elastic Kubernetes Service (Amazon EKS) is a managed service that you can use to run Kubernetes on AWS without needing to install, operate, and maintain your own Kubernetes control plane or nodes. Kubernetes is an open-source system for automating the deployment, scaling, and management of containerized applications. Amazon Elastic Kubernetes Service (Amazon EKS) gives you the flexibility to start, run, and scale Kubernetes applications in the AWS cloud or on-premises. Amazon EKS helps you provide highly-available and secure clusters and automates key tasks such as patching, node provisioning, and updates.
- In your Cloud9 terminal, follow these instructions to install EKSCTL on Linux.
- Follow these instructions to install KUBECTL on Linux.
- Next, execute the following command to create your EKS cluster. It is that easy! This will take a few minutes.
eksctl create cluster --name workshop --region us-west-2 --managed - Update your kubeconfig to add the credentials for your new cluster with the following command.
aws eks update-kubeconfig --name workshop --region us-west-2 Execute the following command to print out your kubeconfig. Copy the output to your notepad. We will need this later to allow JFrog Pipeline to access the cluster.
cat /home/ec2-user/.kube/config
Execute the following command to create a namespace where we will deploy our application.
kubectl create namespace workshopIn your JFrog Platform instance, go to Administration > Identity and Access > Access Tokens.
Click + Generate Token.
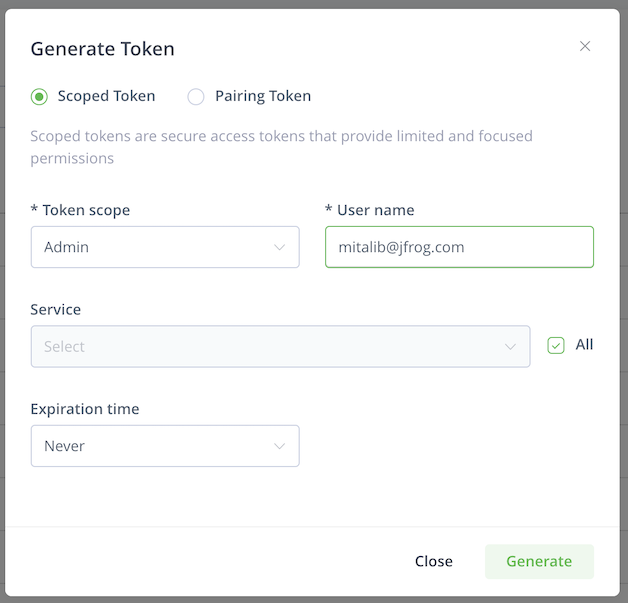
Select Token Scope > Admin and put the UserName. Leave the defaults and click Generate.
Copy the Username and Access Token.
Go back to your Cloud9 terminal, and execute the following command to create an image pull secret that will be used to pull and deploy your image.
kubectl create secret docker-registry artifactory-secret --namespace workshop --docker-server=<your JFrog Platform instance domain> --docker-username=<username from above> --docker-password=<token from above>
Example:
kubectl create secret docker-registry artifactory-secret --namespace workshop --docker-server=myjfrog.jfrog.io --docker-username=mitalib --docker-password=xxxxx...